Buffer
As written on the Home page, the wonderful library doesn't write to screen directly—instead, it puts all operations in a buffer. When the buffer is flushed afterwards, appropriate GPU instructions are compiled to render more efficiently.
If you're familiar with MineOS, you may have recognized the same idea used
there. The buffer it uses, called doubleBuffering, does the same, indeed.
That's not to say we are using it, though. It doesn't quite suit our needs:
after all, we need it to be able to use multiple screens and GPUs. That's why
we've built our own buffer, available in the wonderful-buffer package. It's
several times faster, and consumes a lot less memory. Of course, it supports
multi-screen layouts, too.
The reason there's a separate package for the buffer is that it can be used standalone, without initializing the wonderful GUI system.
Using outside of wonderful GUI system
When using the wonderful buffer outside of wonderful GUI, there are three classes (in wonderful.buffer) you'll likely need:
Buffer, a buffer class that can store changes but not render them. You may use this as-is (e.g., to store image data), or implement your own renderer.Framebuffer, which is basically a flushable buffer.BufferView, a view on some rectangular area within a buffer. It's very convenient for setting a boundary beyond which you can't write (more on that in the section below).
If you look at the source code of those classes, you'll probably notice that
the buffer doesn't store the data directly. It delegates the storage to a
separate low-level class, BufferStorage. It's actually a set of classes:
there are 6 of them, for each tier, and separate for Lua 5.2 and 5.3.
Dependending on the requested resolution and Lua architecture, the appropriate
implementation is chosen. The rationale is to use the most memory-efficient
and perfomant way to store data.
To use a buffer you have to initialize it, passing the depth, which determines the palette model to use, and resolution.
local wbuffer = require("wonderful.buffer")

local buf = wbuffer.Framebuffer {w = 160, h = 50, depth = 8}
You can use buf:set, buf:fill, and other methods to modify the data. See
the API reference for more information.
To flush a framebuffer use framebuffer:flush. You need to pass coordinates
of the top-left corner on the screen, and a GPU proxy.
-- This flushes the framebuffer fb onto the primary GPU, with the top-left
-- corner of the buffer set to (20, 5)
fb:flush(20, 5, require("component").gpu)`
This example shows how to use the buffer outside of a GUI environment.
Buffer views
In a wonderful GUI environment, you don't usually use the buffer directly. A
component's render method gets a buffer view instead of the buffer.
A buffer view is created by calling the buffer:view method. You can also call
:view on a buffer view, which will create a view using the parent view's
coordinate system.
A buffer view implements the basic drawing methods: set, fill, get, etc.,
which are proxied to the buffer. The view also defines a local coordinate
system: the coordinates you pass to those methods are relative to the
top-left corner of the view's coordinate box. Futhermore, it disallows
access to the blocks ("pixels") outside of the so-called restricting box (the
boundary).
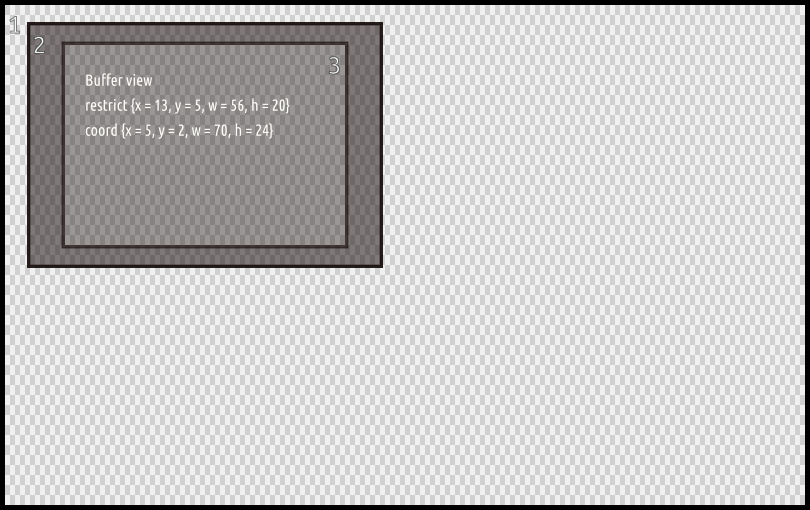
On the picture above, (1) is the buffer, (2) is the coordinate box, and (3) is the restricting box.
(2, 2)in box's coordinate system equals to(6, 3)in the buffer's coordinate system.- But if you try to set a block there, nothing will happen because it's outside of the restricting box.
- The top-left block that is passed to the buffer is
(9, 3)((13, 5)in the buffer's coordinate system).
Why did we separate these boxes? They are indeed equal in most cases, except when they aren't. That is, when an element's container is scrolled. The element's render method doesn't even notice that it is actually scrolled. Thanks to this complexity, we were able to abstract the scrolling away.